


See my name down there at the bottom of this post, just above my social media icons?
Well, today I’m going to show you how to add that there permanently, so every time you write a new blog post it’s already there
Ok, first off you need to open a photo editing service like, Picmonkey. Upload any old photo it doesn’t matter. Then click the resize button

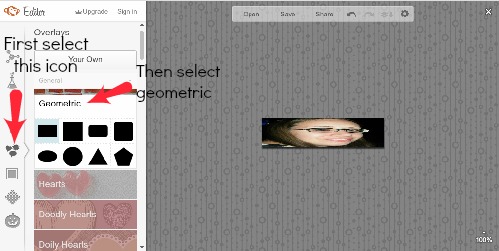


Ok. so now you have your signature saved as an image, now you need somewhere to host it. Or you can use my little trick an save it to a UNPUBLISHED blog post. once you have done this right click on it to get the image url. Then go to settings in your blogger dashboard and select ‘post and comments’. Then in the post template box add:
<img src=”YOUR IMAGE URL”>
then paste your image url, where it says too. Then save.
If you want your signature aligned centered write this instead:
<div style=”text-align: center;”><img src=”YOUR IMAGE URL”></div>
Now your signature will appear at the bottom of all your future posts.
Please note: this will not appear in past posts, you’ll have to do them manually.
Also see my other posts in my Blogging A-Z series
How to Start Blogging
How to Make a Blog header and Button
How to Make a Blog Button Grab Box
Social Media Tips


Great tutorial!! I would love it if you would link up at my {Work It Wednesday} linky party!!
xo
amy
http://theblissfulbee.com/work-it-wednesday-linky-party/
SUCH an awesome tutorial! Would love love love for you to bring it on over to THE Pin It Party! 🙂 Pinning it myself right now!
XO, ellie
http://creativegeekery.blogspot.com/2013/06/the-pin-it-party-9.html
This comment has been removed by the author.
Hi, thanks for explaining this clearly step by step and at some point I will have to try and do this to my blog. I saw it on wow me wed.
Julie from julieslifestyle.blogspot.com
Nice tutorial! I’m so glad you shared it at the Rock ‘N Share! Hope you’ll come again soon! Blessings, D@TheShadyPorch
I love tutorials. you are awesome for being so nice and sharing it with us.